Saturday, August 4, 2012

Book Nook


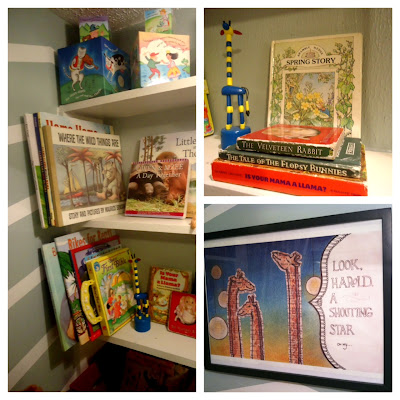
I finally decided to tackle a spruce-up of our basement.  That project is still underway, but it reminded me that I had never shared another corner of the basement with you - Finley's special little space I hope will help him love to read: the Book Nook - which I finished a few months back.


Our basement has one of those giant built-ins made to house an ancient TV.  You remember the ones that were nearly as deep as they were wide?  They took up way more space than a TV ought to.  Wives everywhere are thankful for the inventor of flat screens.  Amen?  Anyway, when our basement made it's final transition from my husband's "Man Cave" to a play room / studio space, the cubby became storage...  Rather inefficient storage.  I was bemoaning the fact that we couldn't rip it out and reclaim that floor space when I realized that it was actually a pretty cool spot for a kid to play in.... and the idea of the Book Nook was born!

This was such an easy project.  It already had shelves on the sides.  So I added paint (a chevron pattern in left-over paint from our bathroom), pillows and a small quilt from Finley's old nursery, a clip-on lamp, a curtain and a bunch of books and snuggly animals.  I still have room for toy storage underneath, and a little out-of-commission nursing stool serves as a step for Finley to hop up.  Voila!

(The adorable giraffe print was a gift from sweet Annie of Brumley & Wells.  I fell in love with it when I saw it online. So whimsical and silly.)

This is a favorite corner in our house!

Tuesday, July 24, 2012

It's the little things...

I'm surviving a week with my husband out of town.  Two weeks actually.  But for the second stretch of time, I'm going to take the kids to my parent's B&B in Cedaredge for a change of scenery.  Wow... you don't truly appreciate someone and all the help, support and grounding they give until they're gone.  I miss him!

Although the house is a mess, the neighbors are mad because my kids were shouting in the yard at 6:55am (yes, I know... too early - please don't lecture me), there's an ant infestation in the kitchen, and I've got about 6 loads of laundry to wash, dry & fold tonight, I'm choosing to be happy about the little things.


Tonight it was these little salt & pepper shakers that made me smile.  I found them in the clearance bin at Anthropologie, which makes me even happier.  Two little love birds...  


Two pairs of love birds actually. 


Ha ha... get it?  Oh dear.  Please forgive me. I need some sleep!

Wednesday, July 11, 2012

Pirate Birthday Party


A few months back I stumbled across this old ship at a thrift store.  Since we were in a pirate phase at our house, I couldn't pass it up.  A couple weeks later I was at Target looking for invitations for another event and found pirate birthday invites in the clearance bin.  Add in a refrigerator box, a mom and a grandma with wayyyy too much creative energy, and that's how a pirate-themed 4th Birthday Party is born!

We had a great time getting ready for this party.  My mom was visiting and she helped me to create the centerpiece - The Dragon Wind - a fairly elaborate ship we fashioned from a refrigerator box:


I have to admit that it got more complicated than I intended... we got a little carried away.  But we had so much fun - it was a family affair! Finley helped us paint the waves, and my boys played in it for several days before the party.  The mast is a pole from a broken sun umbrella, and some old, torn sheets that I had been using as a painting drop-cloth.  Inside the ship, we used our bathroom step-stairs so the kids could get up to the 'lookout'.  Add in some flags, portholes, an anchor cut from cardboard, and a duct-tape steering wheel, and you have heaven for a troupe of little boys.   


Just in case you decide to make your own refrigerator-box creation, the hardest part was reinforcing it because the top tended to sag in.  We decided that if we ever make another one, we would get two boxes and just double them up.  Also of note - duct tape doesn't like being in hot, direct sunlight very much.  We were having a crazy Colorado heatwave, so we learned this the hard way!  If you can build the ship out of the sun, and then let the tape sort of "cure" or stick to the cardboard for a while, that helps.


Sadly, my son decided to jump on the boat at the very end of the party, so it ended up looking like this:  


The other main party activity was a treasure hunt.  We had a couple maps (one they found in a bottle floating in the 'ocean'), a plastic treasure chest (that I picked up at a thrift store, months in advance), and they hunted for various jewels, marbles, gold coins and other baubles that hopefully looked like "treasure" to little ones!  My mom even wrote a picture book all about the treasure hunt led by "Captain Quick Jack Finn" (aka Finley) that we read to the kids as we started the hunt.  They ran to and fro finding the treasure tied up in the tree, buried in the sand box, hanging from the curtain rod in Finn's room, and various other places around our house.


I have decided that cupcakes are the best way to make fun cakes if you know nothing about cake decorating - like me!  Anything I try with frosting is generally a disaster... but this treasure map cake was fun and easy, and didn't take me very long. You can see the instructions here.


My main priority was giving Finley a party that he LOVED.  I think we succeeded!  He was so excited to give each of his friends an eye patch, a pirate bandana and an eye glass (which was actually just a pipe my dad cut into 12" pieces).  He even drew  his own treasure maps for each child, that we included in their favor bags.  Today we sat down and he worked so hard to write thank you notes to his friends and family members.  Happy Birthday again to my amazing little boy! I had such fun celebrating your precious life!


Thursday, July 5, 2012

Happy Birthday from Dr. Seuss

Tonight at story time, Finley requested Dr. Seuss's Happy Birthday to You. I was glad that he did, because in all the chaos of his golden birthday celebrations yesterday (4 on the 4th!), I forgot to read it to him! 


If you read aloud very much, you might agree that opening a Dr. Seuss book is heavenly.  The words roll off your tongue, the rhymes are all perfect, and they always combine just the right amount of story and silliness.  Justin and I have noticed that although we were both read to a lot growing up and many of our favorite and most familiar books overlap, our family-specific lexicon of Dr. Seuss books is completely different!  Many of the Dr. Seuss books that he grew up with, I've never even heard of, and vice versa.  As you can see from the inscription, this is a book I heard every year on my birthday, and loved growing up!

Tonight, Finley had a running commentary and all sorts of questions throughout the book (which, if you know him, doesn't surprise you!).  My favorites were his frequent gasps of amazement, and his comment about this page:


"Wow!  Mom, I think those animals must be extra-strong, extra-fast, and extra-careful, because they don't even fall in the water!"

I can't believe I have a four-year-old.  He challenges me more than I ever anticipated was possible, and some days I want to send him to boarding school for a couple of years... but in moments like tonight, I am blessed beyond measure to get to be his mommy.

Pictures of Finley's outrageous pirate birthday coming soon...

Friday, June 29, 2012

Sesame Street Throw Pillows

According to his mom, my husband has always loved Sesame Street, and Bert is his favorite character. We were cleaning out our closet recently and he was bemoaning the fact that he ought to get rid of his too-large yet beloved Bert t-shirt since he never wears it.  I suggested that I make it into a throw pillow for his new, eclectic office.

Before: t-shirts


He was so excited when he found a 2nd t-shirt at a thrift store with Oscar's face! I sewed them up as a late Father's Day present, and they look great in his new office!  I put a zipper at the bottom so they're washable (and I decided that I need a zipper foot for my sewing machine... it would make things a lot simpler.).

 After: throw pillows


Fun!  They fit in perfectly!  This may start a trend for us... making t-shirts into pillows.  My husband has quite  a t-shirt collection.


Monday, June 25, 2012

Front Yard Rescue

When we bought our little house back in 2009, one of the top things on my to-do list, after a full-blown renovation of the inside, was adding some curb appeal.  I adore our little bungalow, but the front yard is... well... lacking.  I did manage a front porch mini-makeover, but I also had big plans for a fresh coat of paint, new shutters, and some sort of landscaping that I hadn't yet sorted out in my head. However, life happened.  It has a way of doing that, doesn't it?  And after mountains of medical bills, plumbing disasters, job changes - not to mention two active little boys to chase - the front yard still looks about the same... maybe with a few more flowers, and a little more wear.  But, as I told my husband a couple days ago, after making some initial plans with my mom (who is an amazing gardener), I have a bee in my bonnet, and I'm ready to tackle the front yard!

This is what we're working with - this picture was taken when we bought the house, in the summer of 2009:


A little dilapidated and outdated, but good bones, right?  My mom is coming to visit next week, so we're trying to get some of the non-creative work done so she can help us brainstorm.  First phase was the much-needed pruning (you sort of couldn't see the window on the left side of the house... those bushes had gotten a bit out of control.  I'm too embarrassed to show you a before picture!), and killing the grass/weed mix in the parking strip.  We have a couple of spots on our backyard lawn in which we simply haven't been successful growing grass, so I decided to attempt transplanting some of the grass from the parking strip.  It should work like laying sod, right?

I would dig up a chunk of grass, and then my littler helper would pull it down the driveway in this tiny wagon and dump it in the back yard, where I would transplant it.  Hope that our record temperatures this week don't kill off my tender grass!


(I like how I'm transplanting dandelions too, don't you?!)


Also, I think I may have discovered why we have been unsuccessful growing grass in that spot previously.  When I was digging up the weeds and preparing for the 'sod', I found large bricks and ancient metal landscape edging several inches down, under the dirt and existing lawn.  It made me wonder if there is an entire landscape under the lawn, circa 1911, when the house was built.  And over time, it got covered up with dirt and ignored, rather than dug up?  We are aware of the fact that our back lawn has sunk down over time and created a belly in the pipes underneath.  Who knows?!  I dug up a bunch of the bricks, and left a few that do have grass growing over them.  


I'll report back soon with inspiration pictures, and hopefully more progress to show you!

Wednesday, March 7, 2012

Turquoise DIY Cake Stands

There are DIY cake stands all over blog land these days, and I finally made my own. This was an extremely easy, quick project. And I loved the height/interest it added to my table of yummy food for M's birthday. Yay! I think I'll be using them often.


Supplies:
plate
candlestick
adhesive
spray paint


I picked up plates and candlesticks at a thrift store for a few pennies, Krylon spray paint in Blue Ocean Breeze, and I used E-600 adhesive I found in the junk drawer. However, have you ever read the info on the back of E-600? Yikes. I think I'm going to throw it out and find something hopefully less toxic for my next project. I waited until the boys were out for the afternoon, and then I took my project to the back of the yard to make sure none of the fumes sneaked into our house!

Put the plate face down. Glue the candlestick onto the bottom of the plate, and let it dry with something heavy sitting on top. Then with the plate still face down, spray paint the candle stick and bottom of the plate. This ensures that the top of the cake stand is still food safe. Easy!


I started out with two candlesticks the same height, but one of them ended up being crooked. And I'm glad, because I like the variety that two the different heights bring. Fun!

Friday, February 24, 2012

Old Light Bulbs + Twine = Pears!

We're getting ready for Baby M's first birthday here on Lincoln Street. I can't quite believe it's already been a year since we met him. I'll report back about his birthday party next week - prepare for lots of owls!

Anyway, as I was writing a birthday message to him on a little chalkboard in the bathroom, I realized I'd never shared my twine pears with you.


I can't seem to find where the image originated from, but after seeing a picture of a trio of light bulbs wrapped in twine, I started saving my supplies right away: old light bulbs, twine from the garage, twigs & a glue gun. Free projects are my favorite kind! It was a bit time-consuming to wrap the twine around and around, but easy enough that I could just turn my brain off (it's usually fried after I get the kids to bed every evening anyway!), catch up on my favorite TV show and glue away. I'd like to make a few more, to fill a whole bowl. But for now, I'm enjoying them in this little shelf.

Wednesday, February 15, 2012

Dining Room Curtains

When I saw these fabulous Anthropologie-inspired curtains on Pinterest a few weeks ago from a really fun blog called Besserina, I knew they would be perfect for my dining room. Bess, the author, offers a great tutorial, which I followed to a T -- be sure to go check it out! These curtain made such a splash, she is even offering them for sale on Etsy now. The only adjustment I made to her tutorial was using 70-inch wide fabric to accommodate my large window. I considered adding another ruffle to each panel, but decided to stick with just two, and I love them!

I had been looking for curtains with a slightly vintage feel, but also elegant. I've got a lot of color in my house, so I liked the idea of neutral yet dramatic drapes. Here they are, hanging in my dining room!


And I have to add that osnaburg is my new favorite fabric. It has a wonderful natural color and texture, frays beautifully, and it's quite inexpensive! I found it at fabric.com for under $5/yard. I used about 10 yards for my project, so the curtains cost me less than $50. At that price, they can't be beat, even if this project was a bit time-consuming with all the pleats. They're worth it!

Thursday, February 9, 2012

Back in the Saddle

I find it slightly ironic that as soon as I moved Lincoln Street Lovely over to Blogger, got everything set up and publicly declared my intention to post a minimum of once per week, I disappeared from the blogosphere for 5 months. I could chalk it up to the steeper-than-anticipated learning curve of becoming a family of 4, a case of baby blues, severe sleep deprivation and the resulting brain-fog, or maybe just plain busyness, but I give my apologies! Things are, however, looking up in my little world. We've gotten our family groove back in many ways, Baby M is turning 1 this month, I've implemented some better self-care techniques, and although we're still not sleeping as much as we would like, I'm hoping for some good 7 hour nights in the near future. I've missed being here, and I'm eager to be back. There are so many things I want to share!

Today I want to make sure you know about this fabulous website that a friend showed me. Leave it to her to find beauty everywhere she looks. She inspires me! And so does this site dedicated to color, color and more color: Design Seeds: for all who love color

Here are a two palettes that are speaking to me today:


I could post a bunch more, but I won't. You must go explore this site for yourself. It is ever-changing and ever-inspiring! Doesn't it just make you want to start a project?