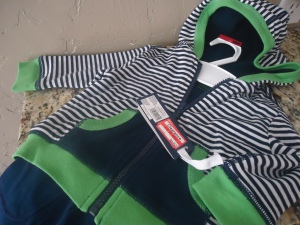
Cute baby not included!
My favorite part: In Japanese, "velcro" is translated "magic tape!" Thank you for the gift, Katy, Craig & Kai!
Cute baby not included!
Stenciled doormat from Lisa Leonard Online - Love!
If you're a member of my family, don't be surprised if you get something similar from me for Christmas next year :)
This stenciled floor from Casa Sugar is making me dream of stenciling my big front porch, which is in need of a make-over..
Another stenciled floor from Loft Life.
Stenciled wall at Apartment Therapy. I'm really loving grey & yellow these days.
Amazing graphic stencil on Isabella & Max Rooms. Who needs wallpaper?
Here are some stenciled items in my little nest.
SHADES:
A while back, I really wanted black and white shades to hang in my new kitchen. I was considering making them out of black and white fabric, but that seemed rather complicated for someone who has never made roman shades. Then I was perusing the clearance end-caps at Target (one of my favorite past-times) and I saw these neutral roman shades, just the size I needed, for $6! I had to go to two stores in order to find three in the right size, but at a whopping total of $18 for custom window treatments, it was well worth my time and gas money. I used some craft paint, with a fabric-safe additive (you can find it at JoAnns', Michaels, or any craft store), and an old stencil I had used for a past project, and voila! Custom window treatments.
I think they look great in my kitchen!
stencil brushes - they are round and fat - the bigger the stencil, the bigger the brush you need
craft paint (for this project I used a wall paint sample... really any paint works)
fabric medium, if painting on fabric
stencil - this one is from Stencil Planet. I just used the little fleur de lis on the left.
Begin by positioning your stencil. You can use a spray adhesive or masking tape, but I generally just hold it tightly. An adhesive is most important when you're doing a large area, or an intricate pattern.
Dip your brush in the paint, and then blot most of it off on a paper towel. You want the brush to be covered in paint, but almost dry.
Starting in the center of the stencil and moving out to each edge, tap lightly and quickly. For this little stencil (4x3 in), I tapped 50-100 times to cover the entire area.
Peel the stencil back carefully. Repeat!
I stenciled this fleur de lis pattern in two muted tones on this tray, for a layered effect.
Cute matching T's for my boys - they'll fit next summer!

A 2-piece sweater/pants set with cute details for $4.24! Emerson will be able to wear this in a year or so...
And this T for M to wear this summer was just too cute to pass up for $1.12!
Where do you find affordable kid's clothing? Any tips to share?
I wish I had a "before" picture to show of our master closet. When we bought our house, it wasn't a closet at all... just the old stairs/cellar access to the basement. As part of a large remodel, we planned to build a floor with a trap door over the stairs (which are only necessary for moving things in & out that don't fit down the new spiral staircase), and then create a walk-in closet over the cellar stairs. Brilliant, right? Well, yes, but... we've lived here a year and a half, and the closet was only recently completed because of myriad complex issues. We've limped along with an un-insulated, rickety closet this whole time, featuring a door to the back porch, across which we hung a drooping closet rod. I'm amazed it didn't come crashing down in the middle of the night. During the winter months, our closet was so cold that we avoided opening the door. Big piles of clothes lived on our bedroom floor instead! A friend recently helped us finish our closet, and he did a fabulous job with a really crazy space! I'm not ready to show pictures of the whole space yet... it's still pretty unorganized. The fact that I am still between maternity clothes and regular clothes doesn't help - I have everything crammed in together. However, we are getting there slowly. A couple weeks ago, I dragged my husband to Home Depot in order to buy a peg board and an accessory kit. I had plans to turn an un-used cranny into an accessory wall to house my husband's fedora collection, along with my scarves, hats, purses and belts. He mounted it for me, and within a few moments, I had claimed every last inch of the wall! I suppose I need to use one of the pegboard scraps to make a space for his fedoras...
Pegboard cut to size - $15
Pegboard accessory kit - $8 (with lots of left-over pieces for future projects!)
3-Basket pegboard kit - $10
scraps to mount behind the pegboard so that it sits a little off the wall - free
TOTAL: $33
Not bad for a custom accessory wall! And the best part? I can rearrange it anytime I buy a new purse.
More on the details of Emerson Reed's nursery in an upcoming post!